

World and Eye Coordinate Systems
EXERCISE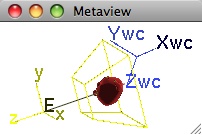
|
Click here to run the program. The basic interactive controls are documented in the html greeting page you will see when the program starts.
Problems
To accomplish the tasks in some of the problems below, you will need to go to the "Display" tab of the Control Panel window. Once there, you will need to select the indicated model from the "Show" drop-down menu. This may or may not result in the model being visible – that depends on the current view settings – but selecting it will cause OpenGL to actually try to draw it. Several of the problems ask you to then establish view settings to make such selected models actually appear in various positions and orientations. As an aid in determining appropriate viewing parameters to accomplish those tasks, use the "Info" drop-down menu to see world coordinate bounding box information for the various objects.
Tip: Before selecting the desired model from the "Show" menu, first click the "Hide All" button in the row below the drop-down menus. Some models completely surround others, so hiding everything except the model for which you are searching avoids the possibility of your model being obscured by another.
Unless explicitly stated otherwise, all questions that ask for projection viewing parameters should be assumed to be requesting perspective projection viewing parameters.
- Without using the "Focus On" drop-down menu, set the eye point, center point, up direction vector, and frustum so that the Teapot model is completely visible in and occupies most of the View window. Use a strategy that involves the eye coordinate z-axis being parallel to the world coordinate z-axis and passing through the (approximate) centroid of the geometry. You can then compare your results with those obtained by using the "Focus On" functionality.
- Switch to the "saloon" model:
- Repeat problem #1 using the saloon model.
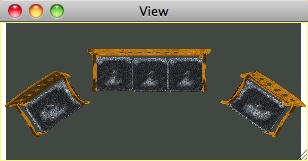
- Adjust the line of sight to obtain an off-axis view of the saloon similar to the one shown here. Adjusting the line of sight should require only changing the eye point; you may also need to adjust the view frustum to avoid unwanted clipping.

- Switch to the "stage coach" model:
- Repeat problem #1 using the stage coach model.
- It should now appear to be moving from right to left; adjust the relevant viewing parameters so that it appears to be moving left to right.
- Adjust the relevant viewing parameters so that it continues to appear to be traveling left to right, but now also angling into the screen.
- To this point, you should not have needed to adjust the "up" vector. Do that now to make the stage coach appear to be driving up a hill at, say, a 45 degree angle. (You may want to first undo what you did in step (c).)
- Switch to the "chair garden" model:
- Repeat problem #1 using the chair garden model.
- Adjust the line of sight to achieve an off-axis view.
- Adjust the line of sight and other relevant viewing parameters to look directly down on the chairs from above to achieve a view somewhat like that shown here. (You will also need to change the up vector. Why?)
- Make the eye and world coordinate systems coincident with one another and then set the frustum so that the alarm clock is in the View window and occupies as much of the window as possible. Describe the appearance of the view frustum. Describe the appearance of the alarm clock in the View window.
- Make the eye and world coordinate systems coincident with one another. Can you set the frustum so that the Teapot appears in the view window? If so, how? If not, why not?
- Make the eye coordinate system have the same orientation as the world system, but translated away by the vector (-100,0,200). Try to set the frustum so that it contains the teapot. How close can you get?
- Set the eye point to (-450,150, 0) and the center of attention to (100,20,40). Set the frustum so that it contains the teapot and so that the teapot occupies as much of the View window as possible.
- The "Focus On" functionality defines the center of attention to be the middle of the bounding box for an object. Use "Focus On" to isolate one or more objects in turn. For each, click and drag on the eye point and/or use the eye point spinners in the Control Panel to demonstrate that the line of sight always passes through the object, no matter what you do with the eye point. Whether the object remains in view is another matter. Explain. What degenerate viewing situations can you cause by moving the eye around, and what do you see? Explain.