Lab 1: Hello Nao
Learning Goals
- Students will learn how to connect to the Nao robot and program robot behaviors from their computer using Python and Qi.
- Students will gain experience programming the Nao robot's verbal and nonverbal behaviors by writing a program where the robot introduces itself to a new user.
Slides
Here's a link to the slides from today's lab.
Lab Preparation
Preparing Your Development Environment
Before you can start programming Nao, each of you will need to set up your development environment. The following steps detail how to set up the environment for this lab.
Note: Throughout this course, you will use the lab desktop computers to program Nao and run all code.
Important: Before reaching out to the teaching team for help, please read the Common Errors & Troubleshooting section at the end of this lab. Most setup issues can be resolved using those instructions.
- Pull up a terminal and navigate to where you want to put your lab folder for this class.
-
Create
EECS690_HRI_Lab: Create one folder where you will keep all of your lab work for this course.In the terminal, you can create this folder by running:
mkdir EECS690_HRI_Lab -
Create your virtual environment (follow this exactly): We use a virtual environment so everyone installs the same Python packages in one isolated place, which makes setup and debugging much easier. In the terminal,
cdintoEECS690_HRI_Laband create a virtual environment namedvenv:
After activation, you should seecd EECS690_HRI_Lab python3 -m venv venv source venv/bin/activate(venv)in your terminal.
Important: Please name your virtual environmentvenv, not.venv. A folder that starts with a dot is hidden on Linux, so it will not appear when you typels. Hidden folders only show up withls -a, which has caused confusion for students in the past.
When you're done coding, to deactivate your virtual environment, run:deactivate
-
Install dependencies: With your virtual environment activated, install only the package needed for this lab by running the following command in the terminal:
Important: Do not runpip install qipip install naoqi. That is not the module we are using for this course, as it only works on python 2. -
Create your Lab folder and add the starter code: Inside
EECS690_HRI_Lab, either:-
Use our template repo:
- Open the template repo: lab_1_hello_nao_starter_code
- Click the Code button on GitHub and copy the HTTPS clone URL
- In the terminal, change into
EECS690_HRI_Lab(where you want the lab folder to live) - Clone your copy so the folder is named
lab_1_hello_naoand sits directly insideEECS690_HRI_Lab. Example:git clone https://github.com/your-username/lab_1_hello_nao.git
-
Manually copy the starter code: In the terminal, create the folder and file with:
Then copy the following starter code intomkdir lab_1_hello_nao touch lab_1_hello_nao/nao_introduction.pylab_1_hello_nao/nao_introduction.py:
This starter code assumes thatimport sys, time, os, qi if len(sys.argv) > 1 and len(sys.argv) < 3: #ensures proper number of arguments ROBOT_IP = sys.argv[1] ROBOT_PORT = 9559 else: print("please provide proper number of arguments") print("Proper program usage: python3 name.py IP_ADDRESS_HERE") sys.exit(1) def main(): session = qi.Session() try: print(f"Connecting to NAO at {ROBOT_IP}:{ROBOT_PORT}...") session.connect(f"tcp://{ROBOT_IP}:{ROBOT_PORT}") print("Successfully connected to NAO!") except RuntimeError as e: print(f"Failed to connect to the robot at {ROBOT_IP}: {e}") print("Please try again") sys.exit(1) try: tts = session.service("ALTextToSpeech") #initialized text-to-speech service except Exception as e: print(f"Failed to load services: {e}") sys.exit(1) tts.say("Hello! My name is Nao!") #TODO finish Nao's introduction if __name__ == "__main__": main()lab_1_hello_naois directly insideEECS690_HRI_Lab.How to run: With your virtual environment activated and while inside
lab_1_hello_nao, run:
Replacepython3 nao_introduction.py <NAO-IP-ADDRESS><NAO-IP-ADDRESS>with your robot's IP address.
-
Use our template repo:
-
Use this folder structure: To make debugging easier, everyone should organize their files in the same way:
EECS690_HRI_Lab/
├── venv/
├── Python-SDK/
├── lab_1_hello_nao/
│   └── nao_introduction.py
Working in Groups
During this lab, you will work at a table with 2-3 students and 1 Nao robot. Each individual within the group is expected to write their own code and implement their own robot introduction. While each student is completing their own work on the robot, we highly encourage your groups to collaborate with one another by sharing ideas and helping each other debug your code.
You will work with a new group for all of the robot programming labs (Labs 1-3) so that everyone gets a chance to work with different people. Group assignments can be found on the board in Eaton 2002 when you arrive.
Lab 1 Deliverables & Submission
Your work on Lab 1 will involve programming the Nao robot to introduce itself using our starter code as a starting point. Your are expected to upload the following to Canvas after you have completed the lab:
- A video of Nao performing your introduction
- Your source code:
nao_introduction.py
To receive credit for this lab, you will need to submit your video and code to Canvas by Thursday, September 3, 2026 at 11:59pm.
Connecting to Nao
Follow these instructions to connect to Nao. We used the Nao documentation to create these instructions.
Turning Nao On
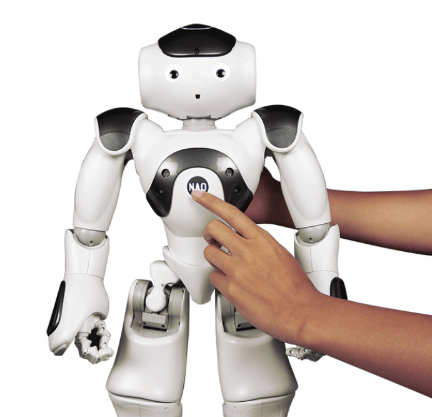
Before turning Nao on, make sure it is in a stable position. To turn Nao on, press the button on Nao's chest. The robot will take a few minutes to fully boot up. Once the robot is ready, it will say "ognak gnouk".
Once you are done using the Nao Robot, to turn Nao off, hold this same button for about 5 seconds. Nao should now say "gnuk gnuk," and will fully power off in about a minute. Please ensure that Nao is in a safe and in a stable sitting position before powering off.
Connecting to Nao
In order to program Nao, both your computer and the robot will need to be connected to the same network. This means all of the Desktop computers in Eaton 2002 will automatically be on the same network as the robots.
In order to connect to Nao, you will need your specific robot's IP Address. To get Nao's IP, once Nao is powered on, press the chest button once (if done correctly it should flash green), and Nao will say it's IP address.
The default port for the Nao robots is 9559, which is already included in the starter code.
Labs 1-3 Context
In our robot programming labs (labs 1-3), you will be programming the Nao robot to act as a facilitator of a positive psychology exercise called the "Three Good Things." This is a well-known exercise from positive psychology research. The idea is simple: at the end of the day (or week), a person reflects on three good things that happened and briefly thinks about why they happened. Research has shown that doing this regularly can improve mood, increase well-being, and reduce stress. In this exercise, both the robot and the participant will take turns sharing three things that they are grateful for that have happened to them in the past week. If you want to learn more about this exercise, you can read more here: Three Good Things – Greater Good Science Center (UC Berkeley)
Here are a few simple examples of "Three Good Things":
- I had a good conversation with a friend this week.
- I finished an assignment that I had been worried about.
- I got to enjoy a nice meal or take a relaxing break.
For this lab sequence, Nao will eventually help guide the user through sharing these kinds of positive reflections.
We will be programming a different part of this interaction in the three labs:- Lab 1: You will program the robot to introduce itself to the participant as well as the "Three Good Things" exercise the robot will be facilitating.
- Lab 2: You will create a Wizard-of-Oz GUI interface for a human experimenter to control the robot during this interaction, allowing the robot to express both pre-scripted utterances (e.g., introduction, things it is grateful for) and responsive utterances and responses with a text box and other buttons.
- Lab 3: You will leverage an LLM to allow the robot to have a flexible and responsive conversation with the participant through the "Three Good Things" exercise.
Lab 1 Exercise: Robot Introduction
Your Goal
Your goal for this lab is to program a Nao to introduce itself to a new human participant and to introduce the "Three Good Things" exercise (see above). Your introduction needs to make use of all of the following components:
- Verbal speech
- Head movement(s)
- Arm movement(s)
- Position change(s) (changing position between standing, sitting, and squatting)
- LED change(s)
The following video is a simple example of a Nao program that uses all of the components listed above:
Please note that this is a demonstration video of a Nao robot in action, not of an actual lab assignment implementation.
Resources
Here's some information to help you get started: Qi API and NaoQi API are great resources to help you learn about the different components of the Nao robot and how to program them. The Qi API is what we are using with the robots since we are running Python3. However the NaoQi API has many of the same functions and is a good reference for learning about the different components of the robot. Just keep in mind that the NaoQi API is for Python2, so you will need to use the Qi API for your code, and to connect to the robot.
Links to the documentation of the Nao robot in python 2 - Documentation and examples
The modules you should need for this lab are: ALMotion Joint Control, ALRobotPosture, ALTextToSpeech (this one is implemented in the starter code), and ALLeds.
Example Code from Sarah's Lab, connecting to and using the Naos in Python 3 - GitHub Repository
Extra Challenge
If you find yourself wanting to take on an extra challenge, you can try to change the Nao events to allow the user to start the Nao's introduction only when it's sensors are triggered.
Common Errors & Troubleshooting
Nao Connection Errors
If you see an error like the one below, it means there is a problem with the connection to the Nao robot.
Failed to connect to the robot at [IP_ADDRESS]: disconnectedBefore troubleshooting, make sure that:
- You are using the correct Nao IP address
- Nao has fully booted up
This error is commonly caused by a network issue, if you retry the connection a few times and it still fails, you may need to reboot the Nao or Desktop computer, and re-try the connection.
Can't install packages errors
If you're having trouble with the command:
pip install qi Ensure that your virtual environment is activated before you run the pip install command. You should see (venv) in your terminal prompt if your Virtual Environment is activated correctly.
Module Not Found Errors
Even after running pip install qi, you might still see errors like these:
ModuleNotFoundError: No module named 'qi'
For this lab, the most common causes are:
-
Python version: Ensure that your Python version is >= 3.10. You can check your Python version by running in your terminal:
python3 --version - your virtual environment is not activated
- your import statement in the code is incorrect
Once your packages are installed in the correct location, they should be properly recognized by your Python installation.
Quick Debug Checklist
- Is Nao powered on and fully booted?
- Are your computer and Nao on the same network?
- Did you activate your virtual environment? (you should see
(venv)in your terminal prompt) - Did you create your virtual environment as
venvrather than.venv? - Is your python file inside the correct lab folder?
- Are your Python dependencies properly installed?
- Are you using the correct Python version (>= 3.10)?
- Are you using the correct import statements in your code?